Category Archives: Tutorials

November Revamp: Trivets

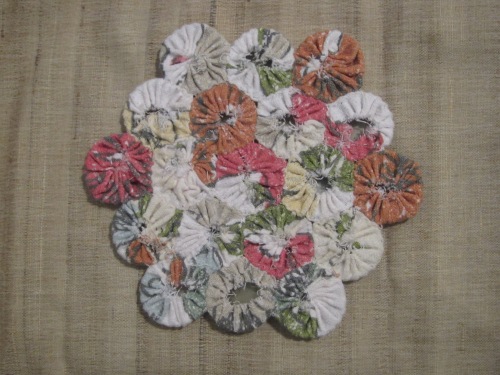
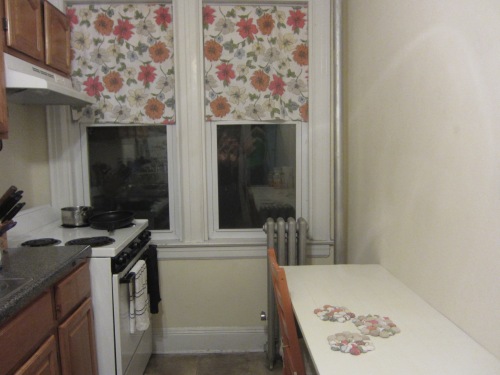
This post is revamped from all the way in 2011. I made trivets having just moved into a school dorm apartment which had a kitchen, so it appears history is repeating itself since I’ve made some trivets to go with my new kitchen in my first real-person apartment. I did the curtains first, and built/painted furniture to bring down some of the colors from the curtains. When all was said and done I still had some curtain fabric left over, and some fabric from the cushions on the chairs, so I did now what I did then and made a set of trivets for my new kitchen.
IMG_4540

This project was originally inspired by a trivet we had at home as a child. My mom had gotten it from a friend a long time ago, and I reverse engineered the process to figure out how to do it. Since then I’ve done it many times, and so I’m revisiting my tutorial to share the technique, because it’s fun and easy, and really cute.
IMG_4536

Because bottle caps are so easy to gather and recycle, the effective cost of this project comes down to the fabric- which I already had because of the curtains. Basically what you need are a sewing kit, so a needle, thread, and something to cut the thread with, and the bottle caps and fabric.
IMG_4438

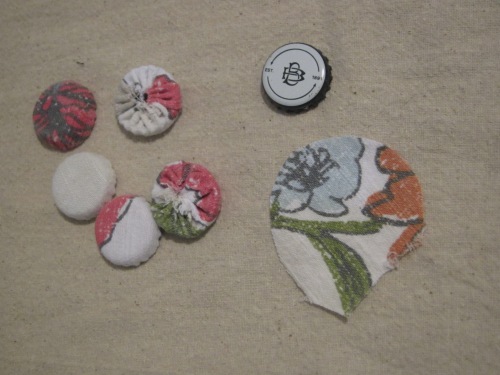
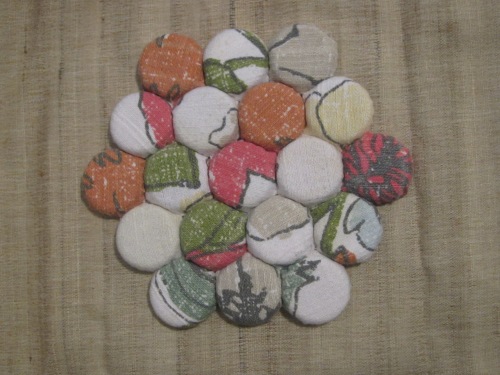
You’ll be essentially covering the bottle caps in fabric, creating little fabric “yo-yo’s” which you’ll then sew together. For a simple circle trivet you’ll need 19 bottle caps. More if you want to make it longer, or a larger size.
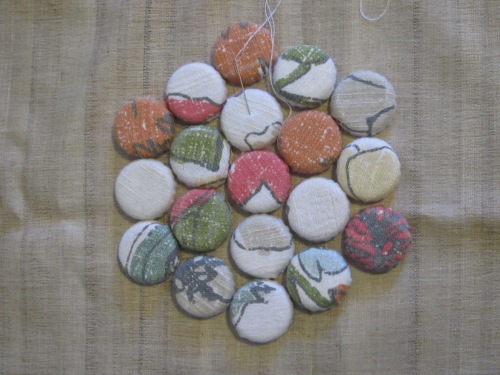
IMG_4492

Cut out a nice circle of fabric, with maybe a 1″ larger diameter than a bottle cap.
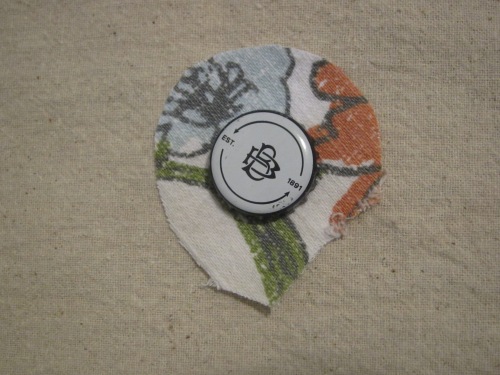
IMG_4439

Your circle does not have to be perfect. Almost none of mine were. It doesn’t matter anyway, because (in a technique similar to these Fabric Yo-yos from About.com) you’ll start by stitching loosely around the edge in a circle.
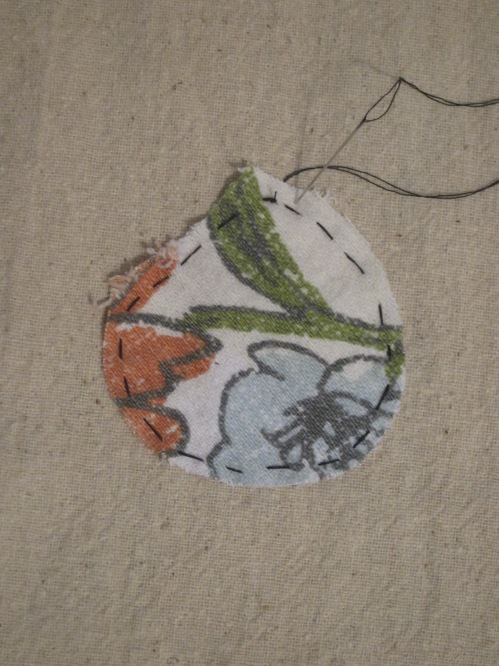
IMG_4450

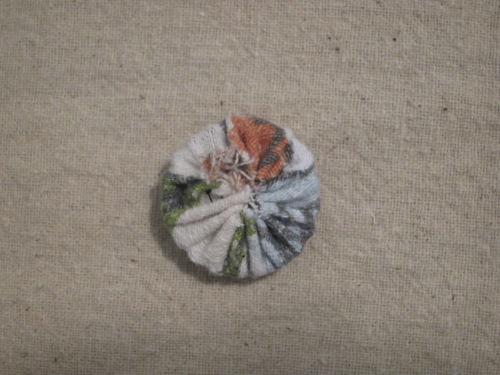
Flip your fabric over, and put your bottle cap on it, top down. Start to pull on the thread, cinching in the stitches.
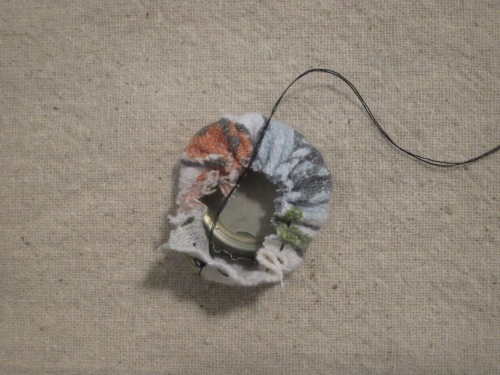
IMG_4453

Pull the thread tight, and if you feel the need to, stitch a second round in the bottle cap, to secure the “yo-yo”. Here’s a finished one.
IMG_4454

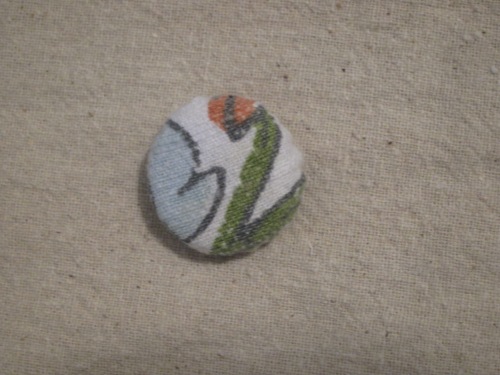
The front of your bottle cap should be covered in one smooth, nice looking layer of fabric.
IMG_4456

Wash rinse repeat however many times you need to until you have enough fabric covered bottle caps for the trivet you want. You may decide to lay them out before you start stitching to make sure you like the final result. I usually do.

IMG_4492

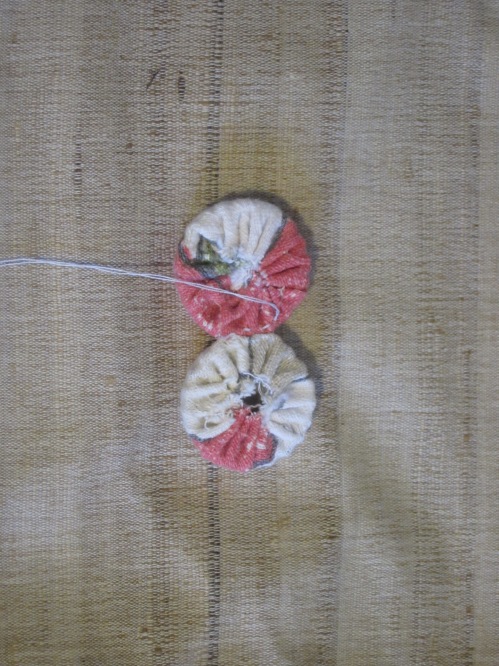
Start sewing together your bottle caps. I use a simple running stitch, adjusting tension wherever I need to to make the fabric lay properly. Sorry I didn’t stitch this in black so you could see it better- I didn’t want to have to unpick my stitches and re-do the whole project later.
IMG_4497

The stitching process can be a little bit tedious but it is really rewarding to watch the pieces build together into something recognizable.

My one piece of real advice is to make sure you don’t miss any seams- think of each piece as if it were a hexagon, and make sure that even the corner pieces have at least three seams connecting them to each other. This will give you a really solid trivet. The back should look like this.

IMG_4519

The finished trivet from the top will look like this.
IMG_4520

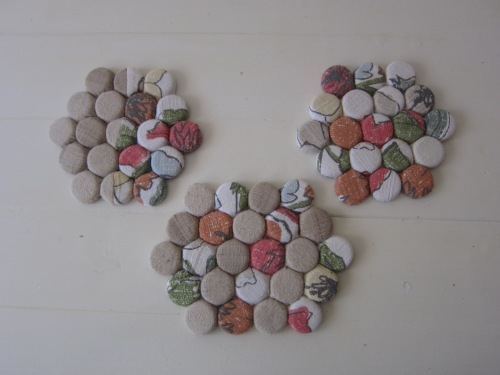
Of course I am nothing if not thorough, so I made a set of three with different patterns. I think the striped one is my favorite!

IMG_4536


June Revamp: A Third Beaded Bead Tutorial

This re-vamp is from the first beaded bead tutorial I ever did, which sadly lacked quality photos, so I’m taking the opportunity to go back through and fix it. You can find the original project photos from this post here, as well as more projects using this technique here.

In general, I’m not a huge fan of most of the fads which have hit the beading world in the last four years. I love mixed media work in theory, but in practice it often comes off feeling cheap and craft-sy, where I prefer jewelry that feels sleek and professional. There was a big wave of picture frame jewelry that came through, introducing many of us to various resins. I had the same problem with many of the results of this fad as well. In general, fads tend to feel cheap and homemade to me, while older techniques from metal work, linking, and stitching almost always feel like real, lasting jewelry. One fad that I can definitely get behind, which is quickly becoming one of the longer-lasting techniques any seed-beader should have in their bag of tricks, is the beaded bead.

IMG_3459

Today, I am finishing the group of three tutorials from this month and creating the tutorial for the smallest beaded bead in that stack. I think I created this pattern myself, but if this is a pattern you’ve encountered somewhere else, I apologize. I guess great minds think alike? Anyway, be nice, and don’t use this tutorial to teach or re-post without crediting please. The creative arts are tricky, I know, but this is one I’d actually like to hang on to. This is probably a project for someone who has some experience with a needle and thread already. If you’re an absolute beginner, I suggest trying a peyote stitch project first, many examples of which you can find by perusing my blog.

IMG_3444

In my beaded beads, I used a size 15/0 purple seed beads (you can use both Czech and Japanese, although I’ve found that the rounder Czech beads tend to work better for this project) and 4 size 8/0 seed beads, as well as a few Delicas (slighly on the small end) Japanese seed beads. You could definitely do this project using 4mm spacer beads and just 11/0 beads, which would result in a larger sized beaded bead. You could replace the spacer beads with anything else that is a 4mm size, or if you want to make them bigger you can just up the sizes, keeping the ratio steady. They’re not intended to be super big beads, but if you’re looking for a way to showcase some really cool stones, this could make a cool focal bead.

IMG_3394

1) Start by stringing four of your seed beads. Loop through them to create a circle, tie off, and continue. You’ll end up going through them a few times to secure the rest of the bead, so don’t worry too much about tension or security right now, just make sure that knot is tight!

IMG_3450

2) String a spacer onto your string and pass your needle back through the bead you just came through, so you create a loop above your bead with the spacer on it. Pull tight.

IMG_3432

4) Repeat with the other three beads in your loop, so your piece looks a bit like a cross. End with your thread coming out of one of your spacer beads.

IMG_3440

5) Pass your needle through all four beads, creating a circle.

6) Pull tight. The beads should cinch up, and look like this from the top…

and this from the side. You can see your previous loop of seed beads there, securely fastened to your new circle of spacers.

IMG_3435

7) Repeat steps 3-6 with four new Delicas.

After step seven, your beaded bead will look like this. End with your thread coming out of one of your seed beads. Doesn’t matter which one.

And from the side.

IMG_3441

8) String four seed beads, and pass your needle through the seed bead from your first loop which corresponds to the seed bead your thread ended up coming out of in step 7, in the opposite direction from the way you threaded it originally, so that you bridge the gap between your spacer beads with the four seed beads.

9) Repeat this process by adding four more seed beads to your thread, and passing back through your point of origin in step 8. After this step the goal is to cover all four gaps between spacer beads with seed beads. You’re halfway done. Pass through the first four you threaded in step 8, and instead of going through the same seed bead to anchor it, head the other direction, through the other seed bead on this side.

10) Add four more seed beads, and continue this pattern until you’ve got a fully anchored beaded bead, with all four gaps between spacer beads covered.

IMG_3446

11) Tie off your thread to itself. Pass through all four spacer beads in a circle. Tie it again. Pass through whichever of the seed beads is nearest, tie it off one more time, and cut your thread.

Congrats! You have a beaded bead. I know it got kinda picture-less at the end. If you have any questions or comments, feel free to write a comment!

Smocked Pouch Tutorial

IMG_3596

I’ve been looking at smocking tutorials for a while and when I saw this pin (in Russian, of course, and without a source, naturally) and felt the need to recreate it with this lovely fabric.

IMG_3595

I am going to put words to images so that you can see how exactly I created this lovely stitched pattern, creating flowers out of the dots, since the original tutorial was missing that.

IMG_3588

You want to pick a dot and anchor your thread just next to it, at about 1 o’ clock (if the dot were a clock). Make sure that the dot is on the far left of a group of four; you’ll be engaging all four of the dots in order to make your flower.

IMG_3591

Then, working clockwise, enter the cloth just adjacent to the next dot at about 7 o’ clock, exiting on the other side of the dot at about 5 0′ clock.

IMG_3592

Continue this pattern, entering the next dot in your square at about 11 0′ clock and exiting at about 7 0′ clock.

IMG_3593

Do the same for the last dot in your square, entering at 1 o’ clock and exiting at 11 o’ clock.

IMG_3594

Finally, you want to end up exiting your thread in the first dot, which you anchored your thread to, at (you guessed it) about 6 o’ clock.

IMG_3595

Pull your thread tight and tie it off. Move to the next set of four in your row.

IMG_3596

Work across the fabric until you have filled the space you intended to smock! You can use your fingers or a pencil to straighten out the folds between flowers once you’ve finished them. I chose to keep my stitches linked together, and lined my pouch in order to protect them, but it’s totally your call whether you do that or not.

IMG_3586

As you can see above, the fabric “expands” below the smocking, which basically acts the same way that pleats do to gather and pooch fabric so keep that in mind when creating something functional using this technique.

IMG_3598

I’m pretty happy with this pouch, though I’m not really sure what I’ll use it for yet I know it’ll come in handy!

Circular Peyote Beaded Beads

IMG_3459

Recognize this photo? I re-vamped an old beaded bead tutorial for the middle bead in the “stack”. Today, I’m going to share a totally original tutorial for the bead in the bottom of the “stack”, the largest one.

IMG_3361

This tutorial uses four different sizes of beads and what is basically a circular peyote stitch (or a netted stitch, if you prefer).  A quick run down of your supplies in relation to a 4mm round as the largest in the bead: 4 4mm round spacer beads, 8 3mm spacer beads (in this a size 8/0 seed bead), 4 size 10/0 or 11/0 seed beads, and some size 11/0 seed beads all in complementary colors (plus the requisite needle, thread, and beeswax).

IMG_3337

We start with alternating four of your 3mm beads with four of your smallest 11/0 beads. [Sidenote: I refer to small and large 11/0 beads in this tutorial mostly because I used both Japanese Delicas and Czech seed beads for this project, and the Japanese were smaller than the Czech beads. You do want two sizes for this project, and just because they’re both classified as 11/0 doesn’t mean they’re the same exact size. I’ve written more extensively about bead sizes, if you’re interested in a long winded explanation.]

IMG_3343

Tie these eight beads in a circle. Knots are fine here, they’ll soon hide themselves.

IMG_3345

Make sure your thread is exiting through one of the 11/0’s and thread 5 more 11/0’s onto your needle. Then, pick up the next 11/0 in your circle, skipping the 8/0 bead.

IMG_3348

Continue this pattern all the way around your circle. Each time you exit an 11/0 bead from your circle, add five more, and go to the next 11/0.

IMG_3351

When you finish your circle, thread your needle through your first loop of 11/0’s, as if you were going to continue your pattern. Exit through the third 11/0, or the one at the middle of your loop.

IMG_3317

At this point you’ve got a florette looking thing going on, with the thread exiting out of the top of the piece.

IMG_3319

String one of your 4mm spacers and then pick up the next “point” bead in the circle. This is the 3rd bead in the loop of 11/0’s.

IMG_3322

Continue this all the way around the circle- you’ll now have used up your 4 4mm spacers. Do you see a pattern? It’s the same pick-up-a-bead, skip-a-bead pattern of the circular peyote stitch, or a netted stitch, just using different sizes of bead in order to create a nice concise round bead.

IMG_3323

When you pull the bead taut, you’ll get this sort of effect. You could easily stop here and use it as a bead cap.

IMG_3325

Looking at it from the top you’ll see that there are some rather large gaps between the 4mm spacers.

IMG_3327

With your thread exiting a spacer bead, add one of your 4 larger seed beads and go through the next spacer bead in the circle. Continue this pattern all the way around.

IMG_3354

Do the same exact thing with 4 more of your smaller 11/0’s to create a base for the finishing loops.

IMG_3330

At this point you’re repeating the same steps as you did before, going through an 11/0 from your circle, adding 5 11/0 seed beads, and going through the next 11/0 in the circle to create loops.

IMG_3331

Again, you need to finish with your thread coming out of the peak bead of one of your loops. Basically, we’re creating the first half of the bead backwards in order to close it off.

IMG_3333

In order to finally close the bead, pick up one of your 3mm beads (or 8/0 beads) and then go through the next “peak” bead.

IMG_3336

Repeat to finish your circle.

IMG_3356

Tie off your thread however you prefer.

IMG_3360

Sometimes this leaves a rather cylindrical final product. If you’re looking for a rounder effect, you can stitch back and forth through the bead connecting the 3mm beads (or 8/0 beads).

IMG_3361

With a little bit of tension in your stitches, a rounder final product is totally feasible.

IMG_3081

You can also work this technique around a cord or a larger wire. Usually I recommend not trying to force a cord through the bead in order to save the cord the added stress. Working around the cord from the beginning is a good way to save the stress.

IMG_3092

You can also alter the technique by adding more “sections” to your circle to create a differently shaped bead, in this case a saucer shaped bead. These make great pendants, hoop earrings, whatever you can think of!

As you can probably tell beaded beads are some of my favorites. I love these especially well and would love to see what you make with them!

May Re-vamp: Beaded Bead Tutorial

This post is part of my monthly re-vamp series, so you may have seen it before. I’ve replaced the photos with higher quality photos and am including this new photo of some new earrings which use beads from all three of my beaded bead tutorials. Each of these tutorials will be re-vamped and posted here within the next month or so.

IMG_3459

This tutorial is for the center bead in the “stack”.

IMG_3430

In order to make these beads, you’ll need some 4mm rounds, or beads which are approximately that size. I used size 8/0 seed beads for these particular ones.  You’ll also need at least one kind (I prefer two different kinds) of seed beads. In the case of this tutorial both seed beads I used were a size 11/o, but were two different “cuts”; the purple were a regular glass seed bead and the bronze ones were a “charlotte” cut, which are less regular and have one flat side to provide a reflective sparkle.

IMG_3420

First, you’ll string a pattern alternating your larger beads (my 8/0’s) and your larger seed beads (my 11/0 charlottes).  Tie the ends of your thread together to form a circle  Exit the circle through one of the seed beads as shown (it doesn’t matter which one).

IMG_3422

String 2 larger seed beads, 1 smaller one, and  two larger ones, and connect to the next large seed bead in the circle.  Repeat four times until you’ve completed the circle.

IMG_3424

String through the first part of the first loop and exit the top smaller seed bead as shown.

IMG_3425

Connect the four top larger seed beads as shown.

IMG_3427

Pull tight and tie off.

IMG_3428

Do not cut thread, instead work thread through seed beads until you are exiting a large seed bead from the original circle. Repeat the process for the other side of the bead.  Close the bead and tie it off.

IMG_3430

Your bead should look like this.  The trickiest part of this bead is getting the tension in your thread right so that the bead lies nice and tight together, and doesn’t loosen up.

As always, questions and comments are welcome in the comments section, and keep your eyes open for more beaded bead tutorials coming soon!

February Re-vamp: Wide Bracelet Clasp Tutorial

This month, I’m re-vamping this tutorial post because it’s been a proverbial thorn in my side for a while, and I finally have the time to really do it justice. Last time I did this post, I didn’t pay enough attention to the lighting and focus on the photos, and ended up making my beautiful bracelet look like bacon. Not so in the re-vamp, where I’ve also gone over the wording and content in an attempt to clarify some of the instructions. You’ll find the tutorial below, as well as at the original tutorial’s url.

I made up this clasp structure myself a while ago, out of necessity. It’s really super easy to make, and it’s very useful for those pesky wide band cuff bracelets using seed beads which are hard to finish in a satisfying way.  (My tutorial is really picture heavy, so for visual learners that may help.)

All you need are your side cutters, your round nose pliers, and your chain nose pliers. Also the bracelet you want the clasp for, and some wire. The wire I use is just base-metal and it will eventually wear down, but sterling and gold filled can be used. As long as you’re using half-hard 18ga wire, the kind of wire you use shouldn’t matter, but it is important that it be half-hard otherwise the tension which makes this clasp work won’t be there and you’ll be in danger of losing your bracelet.

First, take your clasp-less bracelet.

IMG_2789

What you want to make at each end of it is, with whatever stitch you’re using (my bracelet is peyote, but really this’ll work with any stitch) is to make a loop about 6 wide (when working with 11/0 seed beads). If you’re working with other sizes, just try to keep in mind that the wire will have to go through your loop about three times, and it’s really helpful that it not be stuck in one position.

IMG_2792

As you can see, my loop was more of a tube because the bracelet is so thick. I don’t think this particular type of clasp would work on anything less than 4 beads wide, but you can try it and decide for yourself if you like the look of this clasp for a thinner project. (Share if you do!)

IMG_2796

You’ll need two pieces of wire, there you can see how they measure up to the bracelet. I tried to make them about 4 times the width of the bracelet. Generally it’s better to cut more wire than less wire, but it’s tricky in this instance because you can end up with a clasp that is too big, and have to do some hardcore re-sizing.

As you can see in the photo above, bend the wire, somewhere between a third and a quarter of the way down. Basically I make the bend and then squish it. This will eventually form the pronged part of your clasp.

IMG_2801

Bend over the other side. You want to make sure that your wire ends are in a position to end up inside the tube of seed beads on your bracelet; this removes the problem of picky wire ends and also creates a nice seamless look.

IMG_2803

Stick it through your loop/tube…

IMG_2807

Bend upwards…

IMG_2808

And create a notch about 1cm long(ish) at the end of each side. These become the prongs, and you now officially have half of your clasp done.

IMG_2813

The other end is a bit trickier. You’re gonna create a loop, like you would any other loop, and make both ends of the wire touch. Like you did on the last wire, in about the same place, grab the wire with your round nose pliers and make a bend.

IMG_2822

With one side of the wire, bend up to make a sharp distinction between your loop and the rest of the bend.

IMG_2824

Then, bend the other way, to create a fully closed loop. Both ends of the wire should be parallel to each other and touching.

IMG_2828

At this point you’ll want to thread your half- clasp through the loop on your beadwork. Center it so that the amount you want to be in your clasp is sticking out from the side. Based on this, you can estimate where you want the other loop on this half of the clasp to sit.

IMG_2836

In order to make the last loop fit, you’ll have to pull back and forth a bit on the wire in the tube, but you should be able to get both ends of your wire nicely hidden in the tube at the end of the bracelet. Congratulations, the hardest part is over!

IMG_2840

Finally, you’ll bend each loop up, to mirror the other side of the clasp, so now one side looks like this…

IMG_2842

…and the other looks like this.

IMG_2841

This is what the clasp looks like when closed.

IMG_2844

Because of the stiffness of the wire,  you basically pinch close to your tube on the side with the prongs gently and they will move out of the loops, without bending too far out of shape. (Not true if you pinch too hard, or attempt to force them by bending the wire. That just bends your clasp out of shape.)

Other bracelets of mine with this clasp include this shell bracelet, the tube bracelet from last month, and the sashiko project to name a few. I’ve been wearing bracelets with this clasp since the turquoise cuff I made waay back in November 2011, and it hasn’t fallen apart. Not secure enough for wild dancing or raves, but secure enough for every day use. (And please remember, most jewelry isn’t secure enough for dancing. If you want to wear jewelry dancing, check all your connections ahead of time and be mentally prepared for the anguish you will feel when you lose it anyway. I speak from experience.)

IMG_2838

If you have questions, ask! If you have answers, answer! If you have comments, comment! You get the idea.

Knitted Bunny Plushie Tutorial

I just visited my second cousin in NY this weekend, and met her baby girl (my second cousin once removed) for the first time. Surely such an auspicious occasion requires a gift, so I made this quick and easy bunny plushie to bring along. I saw the project originally on Pinterest (of course), and I struggled a bit in understanding the project (there wasn’t exactly a tutorial, just a series of photos) so I’m writing a tutorial here for the knitted square bunny in the name of clarification.

IMG_2923

First, you’ll need two knitted squares.

IMG_2868

Specifically, I made one large square using the stockinette stitch, and a smaller square for the tail using the moss stitch.

IMG_2871

For those interested, my stitch count for the big one was 100 and the small one was 20, so the little one should be 1/5 of the size of the big one.

IMG_2872

Take your same-color yarn and weave it in a triangle so that you make ears out of the corners.

IMG_2873IMG_2874


Then, complete your triangle by crossing the center to create a pocket, which you will stuff to create the face of your bunny.

IMG_2875

Once you’ve stuffed the face of your bunny, pull your stitches so that the hole cinches tightly. Wrap your yarn around it a few times and tie to secure it.

IMG_2876

Then, using another length of yarn, start stitching up the rest of your knitting, sewing the edges together. Through all of this stitching you’ll wanna use a running stitch to be sure that you can cinch it as needed.

IMG_2877

Stuff the tube you just created about halfway full. The name of the game with this bunny is don’t over-stuff. You’re gonna need to fold it over on itself in a minute.

IMG_2901

Finally, stitch together the end of the bunny tube, so that it’s all sealed up.

IMG_2902

Cinch the end of your bunny tube so that it looks like this.

IMG_2905IMG_2906

Take the end of the yarn and wrap it around your bunny’s neck so that it becomes a folded over bundle. This is the part of the tutorial I had the hardest time getting right, so I definitely un-stitched and re-stitched my bunny tube a few times to get the level of stuffing right.

IMG_2907

Feel free to punch him a few times in the right places to make sure he’s going to sit the way you want him to.

IMG_2908

Wrap your yarn around his neck a few times and tie it off, and you’re ready to cut the yarn and start on the tail.

IMG_2911

Take your little square…

IMG_2911

Stitch around the perimeter with a running stitch (again, the cinching is important in this scenario)

IMG_2910

fill him with stuffing…

IMG_2913

cinch him and tie him off!

IMG_2914

Then you can stitch the tail right onto his little tush. Super easy.

IMG_2972

To finish him off, add a bright ribbon around the neck and embroider him some eyes and a little wiggly nose!

IMG_2921

Super cute, super easy!


How to Make: Scrap Paper Last-minute Holiday Cards

It’s the day before Christmas and like probably everyone else, there’s some little piece of my Christmas puzzle missing. In my case, it’s holiday cards. I haven’t sent any yet, and I know I was supposed to do that.

IMG_2668

For you it might be gift tags on your last minute gifts, or name cards for your table, or even thank you cards to be sent hopefully within a month of Christmas as soon as possible (this one also applies to me whoops).

This quick and easy scrap paper holiday tree design is simple and fun and takes very little time, so you can get on with the rest of your little holiday details, so I’m going to share with you my process.

IMG_2656

You will need scrap paper in various patterns (Christmas-y colors are great but really any colors will do) as well as cardstock for the base of your cards (or name tags or gift tags or whatever)

First you’ll want to make your bases- I just fold one piece of cardstock in half and in half the other way, cutting to make each card half of the whole piece. This is one easy way to do it, but you can alter your card size as need-be.

IMG_2659

Cut graded triangles (meaning each one slightly larger than the last) from your scrap paper and arrange them so you like the color progression.

IMG_2665


Don’t forget to add a small rectangle of scrap paper at the bottom of the tree for the trunk.

IMG_2670


Glue the triangles so that they over-lap and add the trunk, and voila! A classy, simple holiday design for any paper details in your life. I use rubber cement for projects like this because I can rub away any outlying glue without damage to the card, but it still stays put. Elmer’s would also work well.

Happy Holidays and Merry Christmas!

Holiday Place Cards: A How-To

Today, as a lead into the holidays, I’m sharing a tutorial for these adorable place cards/name tags for the holiday party I’m throwing this weekend.

They’re so adorable and guess what I made them out of?

IMG_2574

That’s right! Paint Chips! You’ll also need some cream cardstock, some patterned paper (mine’s the striped red and white tissue paper), and I used some lovely pearl stickers as accents. These are optional. Also important are the wonderful Elmer’s tacky glue, and a hole punch (mine happens to be heart shaped because…reasons.)

IMG_2586IMG_2587

First, cut an almost-square from the cream cardstock. Mine was 3.5″ x 4″ approximately.

IMG_2570

Fold it in half like a hot dog.

IMG_2571

At this point I like to score the fold, and then weigh it down under something kinda heavy, like my button jar or a glass of water.

IMG_2575

Below you see some of the basic makeup of the cards- specifically the piece where the writing goes later.

IMG_2576

You’ll want to layer a small section of the patterned paper, and a section of the cream (or if you want to be extra fancy, get your hands on some white card stock and use that) on top in a place that looks good, leaving some room to the side for your wreath or tree.

IMG_2583

A thin layer of tacky glue works for this, though I did use rubber cement for this part of it, because I had some extra. For the little pieces, though you’ll want to use tacky glue for extra security.

These are close ups of the parts you’ll need for the wreath and the tree, respectively. You’ll want a bunch of green heart shapes for the wreathes, as well as two red ones for the bow and the pearl accent. For the trees, you’ll want four triangles in ascending order, a piece for the trunk, and the pearl accents.

IMG_2582IMG_2581

This is an image of my setup, I tried to vary the colors I used in both the trees and the wreathes in order to keep it interesting.

IMG_2585

Glue the pieces together in the shape of the accent you want to make- starting with the trunk and layering the pieces for the tree and layering the hearts over each other for the wreath.

IMG_25771IMG_25791

Make sure you use tacky glue to reinforce the pearls, I never trust adhesives from the product!

Enjoy making them! Once you have an army of them you’ll be ready to throw a party and label the cookies with “gluten free” or the dip as “containing nuts”!

IMG_2588

Completely Reusable Wall Art DIY

This is a tutorial for the easiest, cheapest wall art I’ve ever made.

IMG_5764

I got the idea from simplify your space.

I call it reusable wall art because you don’t have to cut or destroy your fabric, and the bases are made of recycled cardboard boxes from cereal and other products!

IMG_5743

Also, gather whatever sizes you’ve got of whatever fabric you want to use. Here are my choices:

IMG_5742


You’ll also want a pair of scissors, a ruler, a pen, and a roll of masking tape.


IMG_5744

Start by cutting apart your boxes. Make sure that you have enough space to leave some overhang, over a specified width for your panels.

IMG_5746


I chose .75″ as my width, and marked it all around the flaps of the cardboard on the inside as well as the outside. Once you’ve done it a few times you probably don’t have to mark everything, but it’s good to start by making sure everything’s even.

IMG_5745

Next, you’ll want to score along those lines, and fold your box into a 3 dimensional rectangle. You’ll probably need to cut the corners a bit to get a clean join, but once you’ve got it put together you’ll want to tape it closed.

IMG_5748

Now your base is complete!

IMG_5747


Plop it down in the middle of your fabric (remember, I’m giving you the no-cut, no-sew, no-permanent glue version of this idea, so you can still use the fabric later.)

IMG_5749

PRO TIP: Iron your fabric first. It’s worth the extra step.

Roll up some masking tape and stick it under each corner as shown, between the cardboard and the wrong side of your fabric. This will keep your fabric from slipping while you fold the corners.

IMG_5750

First, fold in the sides of the fabric around the base.


IMG_5751

Create a dimple so that you can tightly fold in the fabric, creating a nice corner as follows:

IMG_5752

IMG_5753

IMG_5754


All that’s left is to fold in the rest of the fabric to the hollow back of your base, so that it’ll be hidden when it’s hung, and secure it with a little tape.

IMG_5755

Voila! You’ve got a pretty panel of fabric which is ready to hang!

IMG_5756


Sidenote: On some of the more slippery fabrics I added some extra tape to reinforce it so that it doesn’t sag or bag or look bad.

IMG_5757


Because this method allows you to neither glue nor staple nor do anything damaging to your fabric, not only was I able to hang and display fabric I didn’t really care about, but special modroutisk fabric, and even a shirt of mine which I don’t wear that often. (I wanted another solid color on the wall and didn’t have any extra solid fabric handy.)

If you’re looking to do this more permanently I’d advise you to dispense with the folding and just cut your fabric to size, and then use a hot glue gun to attach it to the backing.

IMG_5766


Either way, that big old empty wall in my room is no longer empty, and if I can accomplish that, you can certainly accomplish a similar feat. Hurrah!